How to Make An Auto Apply Coupon in WooCommerce
Planning to add Auto Apply Coupon in the WooCommerce store? Advanced coupons plugin allows you to easily create WooCommerce Apply Coupon Options for your customers. These promotional coupons get automatically applied on the checkout page without any action taken by customers.
It is always more convenient to use such when the offer applies to every customer so that none of your customers will miss out on the deal. Even the customers won’t leave your website in search of coupons. Auto-applied coupons can easily be used on special occasions on your website such as holidays, seasonal promotions, anniversaries, sale periods, and so on. You can also use these coupons to offer store-wide sales such as 10% on every item of your store, free or reduced shipping prices, or minimum purchase amount.
2. Steps to make WooCommerce auto-apply coupon
- Creating a new coupon
- Customizing advance options
- Setting up cart conditions
- Enabling auto-apply
- Advertising the coupon
3. Conclusion
What are the Auto Apply coupons?
An auto-apply coupon is a promotional technique that is activated for your customers on its own. The customers don’t have to do anything to activate the coupon which saves plenty of their valuable time and also gives them a positive experience. It is simple to set up and it comes with a lot of benefits.
Mostly, the customers have to copy the coupon code and paste it while checking out, which obviously requires little effort on their part. But WooCommerce Auto Apply discount coupon applies automatically to every customer who qualifies for it, without any action required on their behalf. This ensures that your customers won’t miss out on any offer they are eligible for.
You can use the Auto Apply coupons when you want to make the offer to every customer or when the offer applies store-wide i.e. on every product in the store.
Auto Apply Coupons can also be used for specialized deals or free shipping offers as there is not any hard and fast rule for the use of the coupon.
Steps to make Auto Apply Coupon in WooCommerce
As aforesaid, setting up a WooCommerce auto-apply coupon is a simple task. You just need to follow the steps that we are going to explain in this blog.
- Creating a new coupon
- Customizing advance options
- Setting up cart conditions
- Enabling auto-apply
- Advertising the coupon
1. Creating a new coupon
To create a new coupon, first, log in to your WordPress dashboard. Then, go to Marketing and click on Coupons.
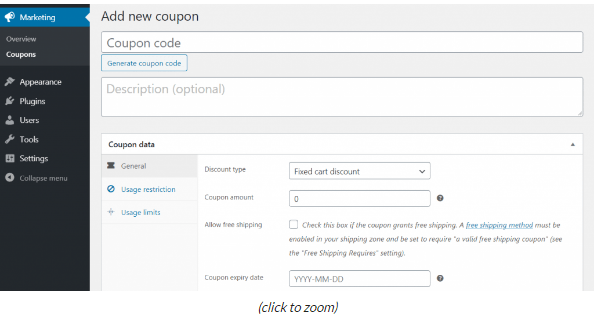
Now a page will open up where you can customize the coupon according to your likings. Even when you are using an auto-apply coupon, you will need to create a coupon code (a code could be anything you want).
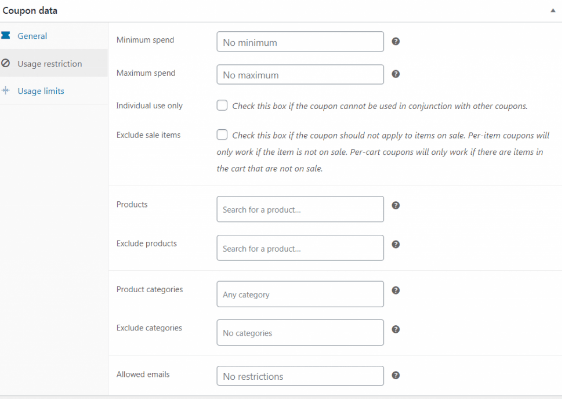
In the next box, you can add a description which will be for internal purposes only. Once you’re done with setting the coupon code, you will now have to configure the coupon. For this, scroll down to the Coupon Data section. Here, you can configure many options such as minimum and maximum spend, coupon expiration date, product categories to include and exclude, and so on.
2. Customizing advance options
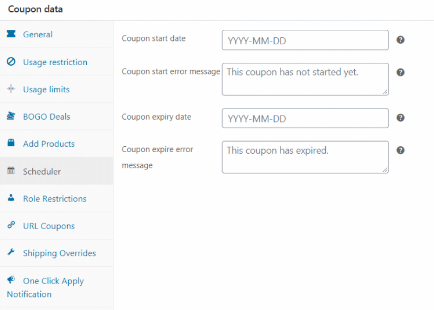
If you are using the WooCommerce default coupon you cannot really avail of these options. But if you are using advance coupon plugin for WooCommerce, you can customize your coupon with advance settings such as-
- Restricting the coupon to particular users only
- Scheduling the deal in advance
- Setting up BOGO deals and many other deals
- Choosing products you want to apply your deal on and so on.
3. Setting up cart conditions
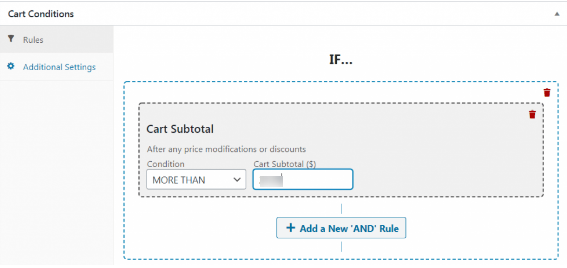
After customizing your coupon with advanced settings, if you still want to customize it, you can do it with the Cart Conditions section. Cart condition sections help you test and create eligibility for your customers before granting them the coupon. If the customer isn’t eligible, he\she will not be granted a coupon.
Here, in the Cart Condition section, you can add conditions i.e. If/Then statements to your coupons such as BOGO deals will be applied to customers on purchases of $50 or more.
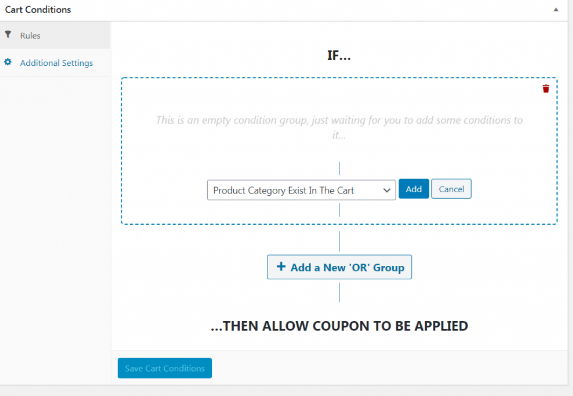 For example, if you want a customer to be eligible to avail free shipping only if he\she spends $50.
For doing this, go to additional settings and choose Cart Subtotal from the drop-down menu and click on the add button.
Then, from the drop-down choose More Than and enter $50 in the amounts section. Now, save the condition and it will the coupon will apply to all the customers who satisfy the condition.
4. Enabling auto-apply
Now that you have customized your coupon according to your likings, you have to enable auto-apply to your coupons. On the right-hand menu of your screen, you will see the option “Enable auto-apply for this coupon”. Just check the box and your coupon will be converted to an auto-apply coupon.

5. Advertising the coupon
Now that you have created an auto-apply coupon, advertising it correctly will bring you more visitors and even more conversions. Make sure that the audience is aware of the promotion. You can advertise it on your own site or you can use other marketing techniques such as email marketing and social media marketing and the list is never-ending.
Conclusion
An Auto Apply Coupon option in WooCommerce can save a lot of effort and time on the part of your customers and give them a positive happy experience. Isn’t this what you thrive for? Auto-Apply coupons ensure that none of your customers misses out on amazing deals.
Also, setting up an Auto-apply coupon is super easy and quick. You just need to follow all the steps that we have explained in our blog and you will be all set to go. For more details, you can refer to Advanced Coupons documentation.



Thank you for sharing Auto apply coupon tutorial these amazing tips I was looking for the same information. Great tips you have shared.